
On this page
Introduction
The goal of this tutorial is to install OpenVSCode on a server, so that you can develop a Laravel website completely online. OpenVSCode is the open source server version of Visual Studio Code and Laravel is a popular PHP framework. With this setup you will be able to develop everything online and no longer need a local IDE.
To achieve the above setup, containers are used exclusively: the official container of OpenVSCode is used to give you the online IDE, an Apache container is used to deliver the website, and a MySQL and phpMyAdmin container are used to store and inspect the database respectively.
This tutorial is a follow-up of the blog post Install Nextcloud with Docker and for this reason, I assume you have a working server with Red Hat Enterprise Linux and Docker installed. If not, please do so, before proceeding. See that blog post for how to install RHEL and Docker.
I also assume that you have one or more domain names that point to your home server. To point a domain name to a dynamic IP address (most ISPs use a dynamic IP address) you can use a dynamic DNS provider. A description of how you can configure this, can be found in the blog post above (see the section Set up Dynamic DNS).
This tutorial uses a reverse proxy to direct all internet traffic to the right container. This is also set up in the blog post Install Nextcloud with Docker. Make sure that you have installed Apache on the host and you have a working virtual host / reverse proxy.
While this blog post is about installing OpenVSCode on Red Hat Enterprise Linux, you can also use this tutorial for installing it on AlmaLinux, Rocky Linux or any other RHEL derivatives.
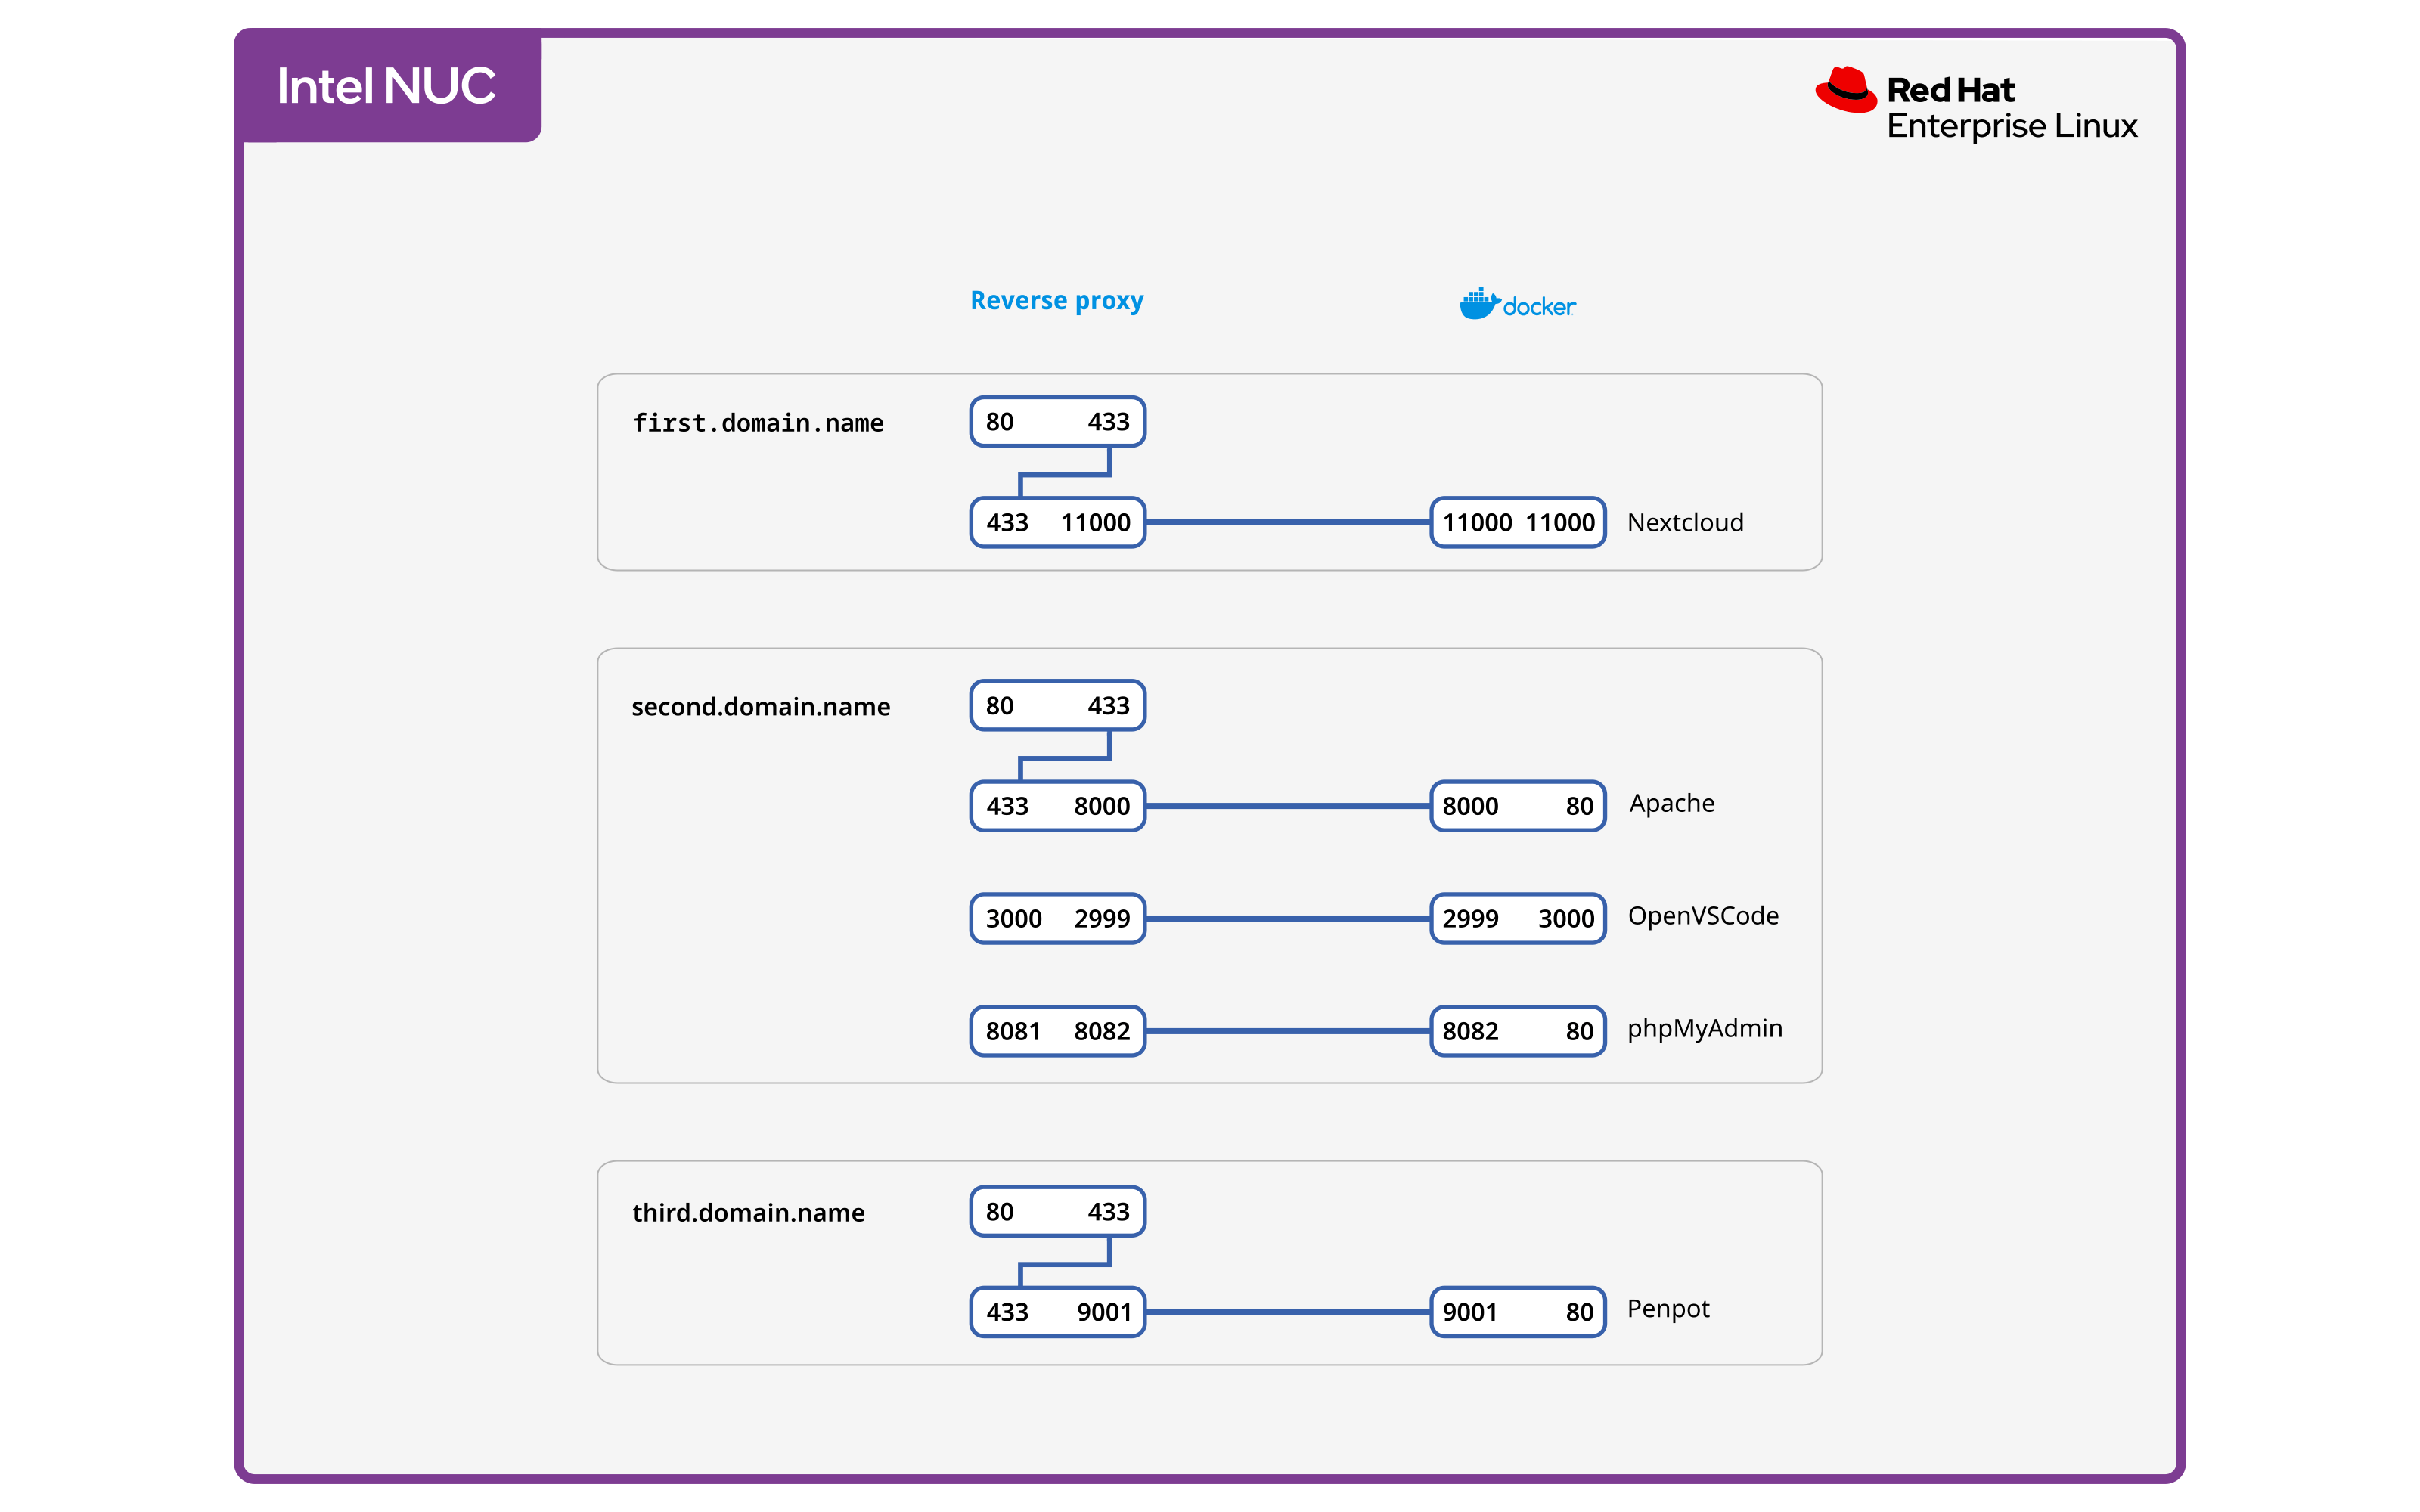
Port diagram
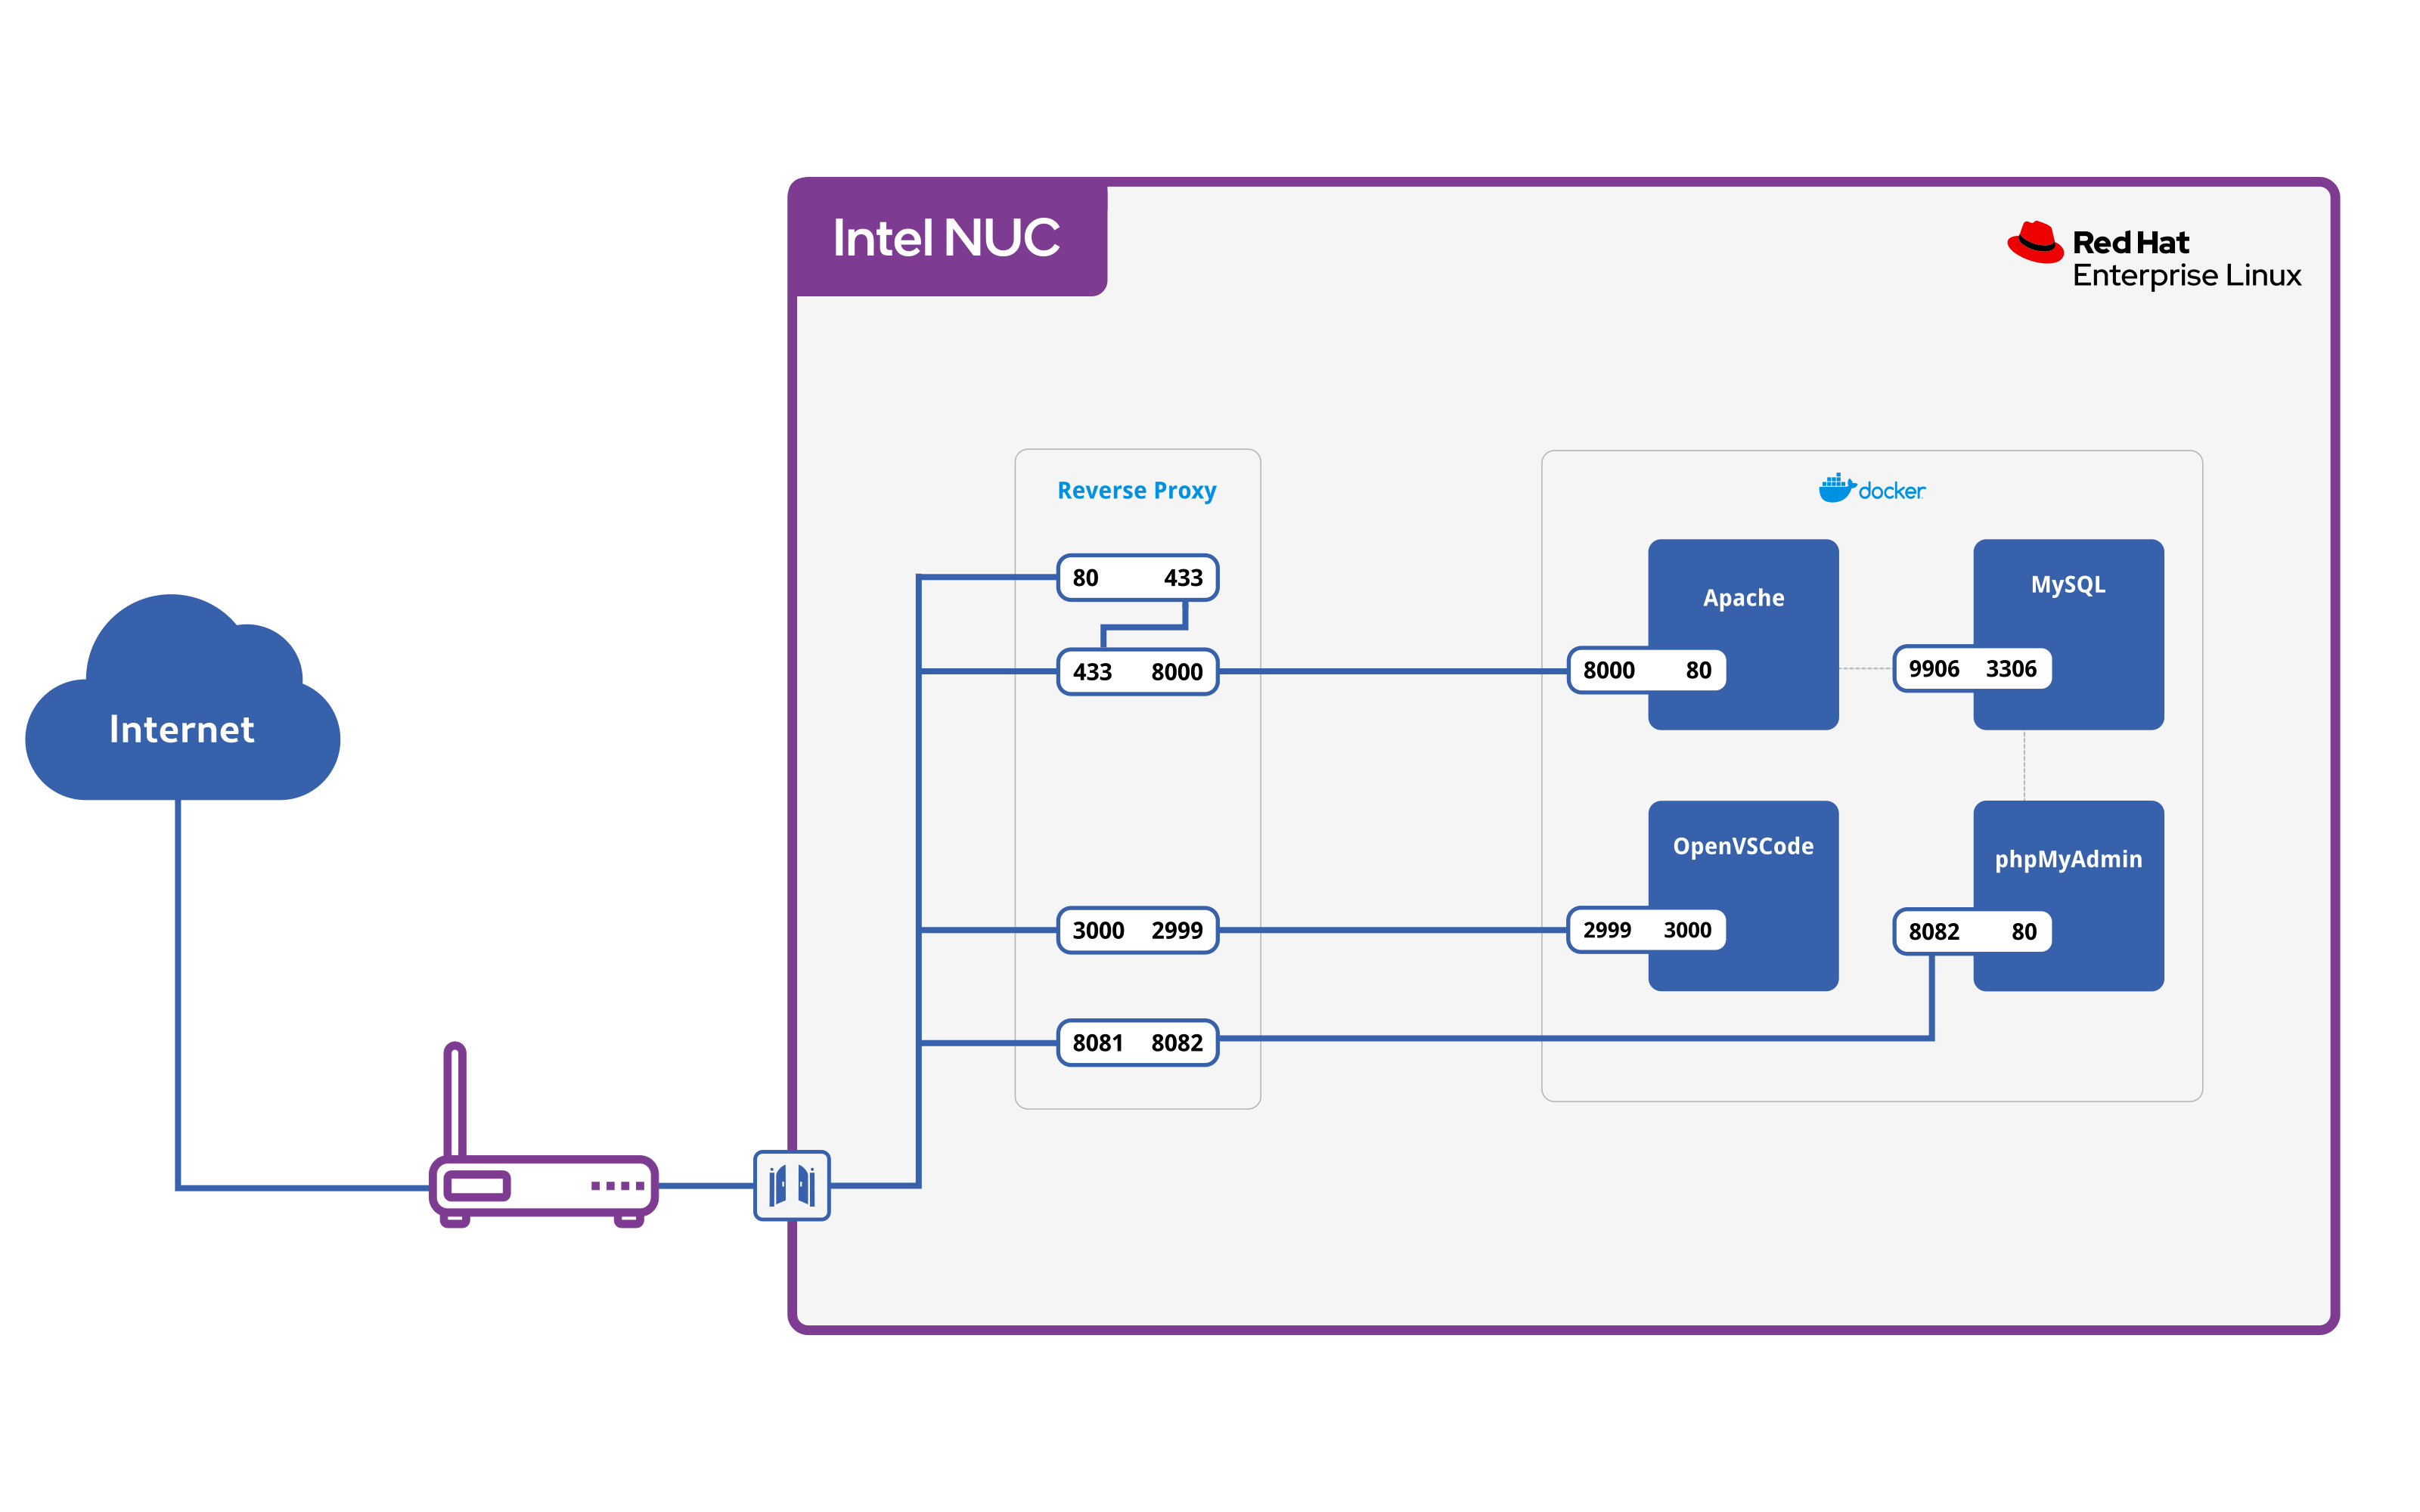
Above you can find the port diagram of server. To avoid conflicts, the containers use different ports than the reverse proxy.
Screenshots

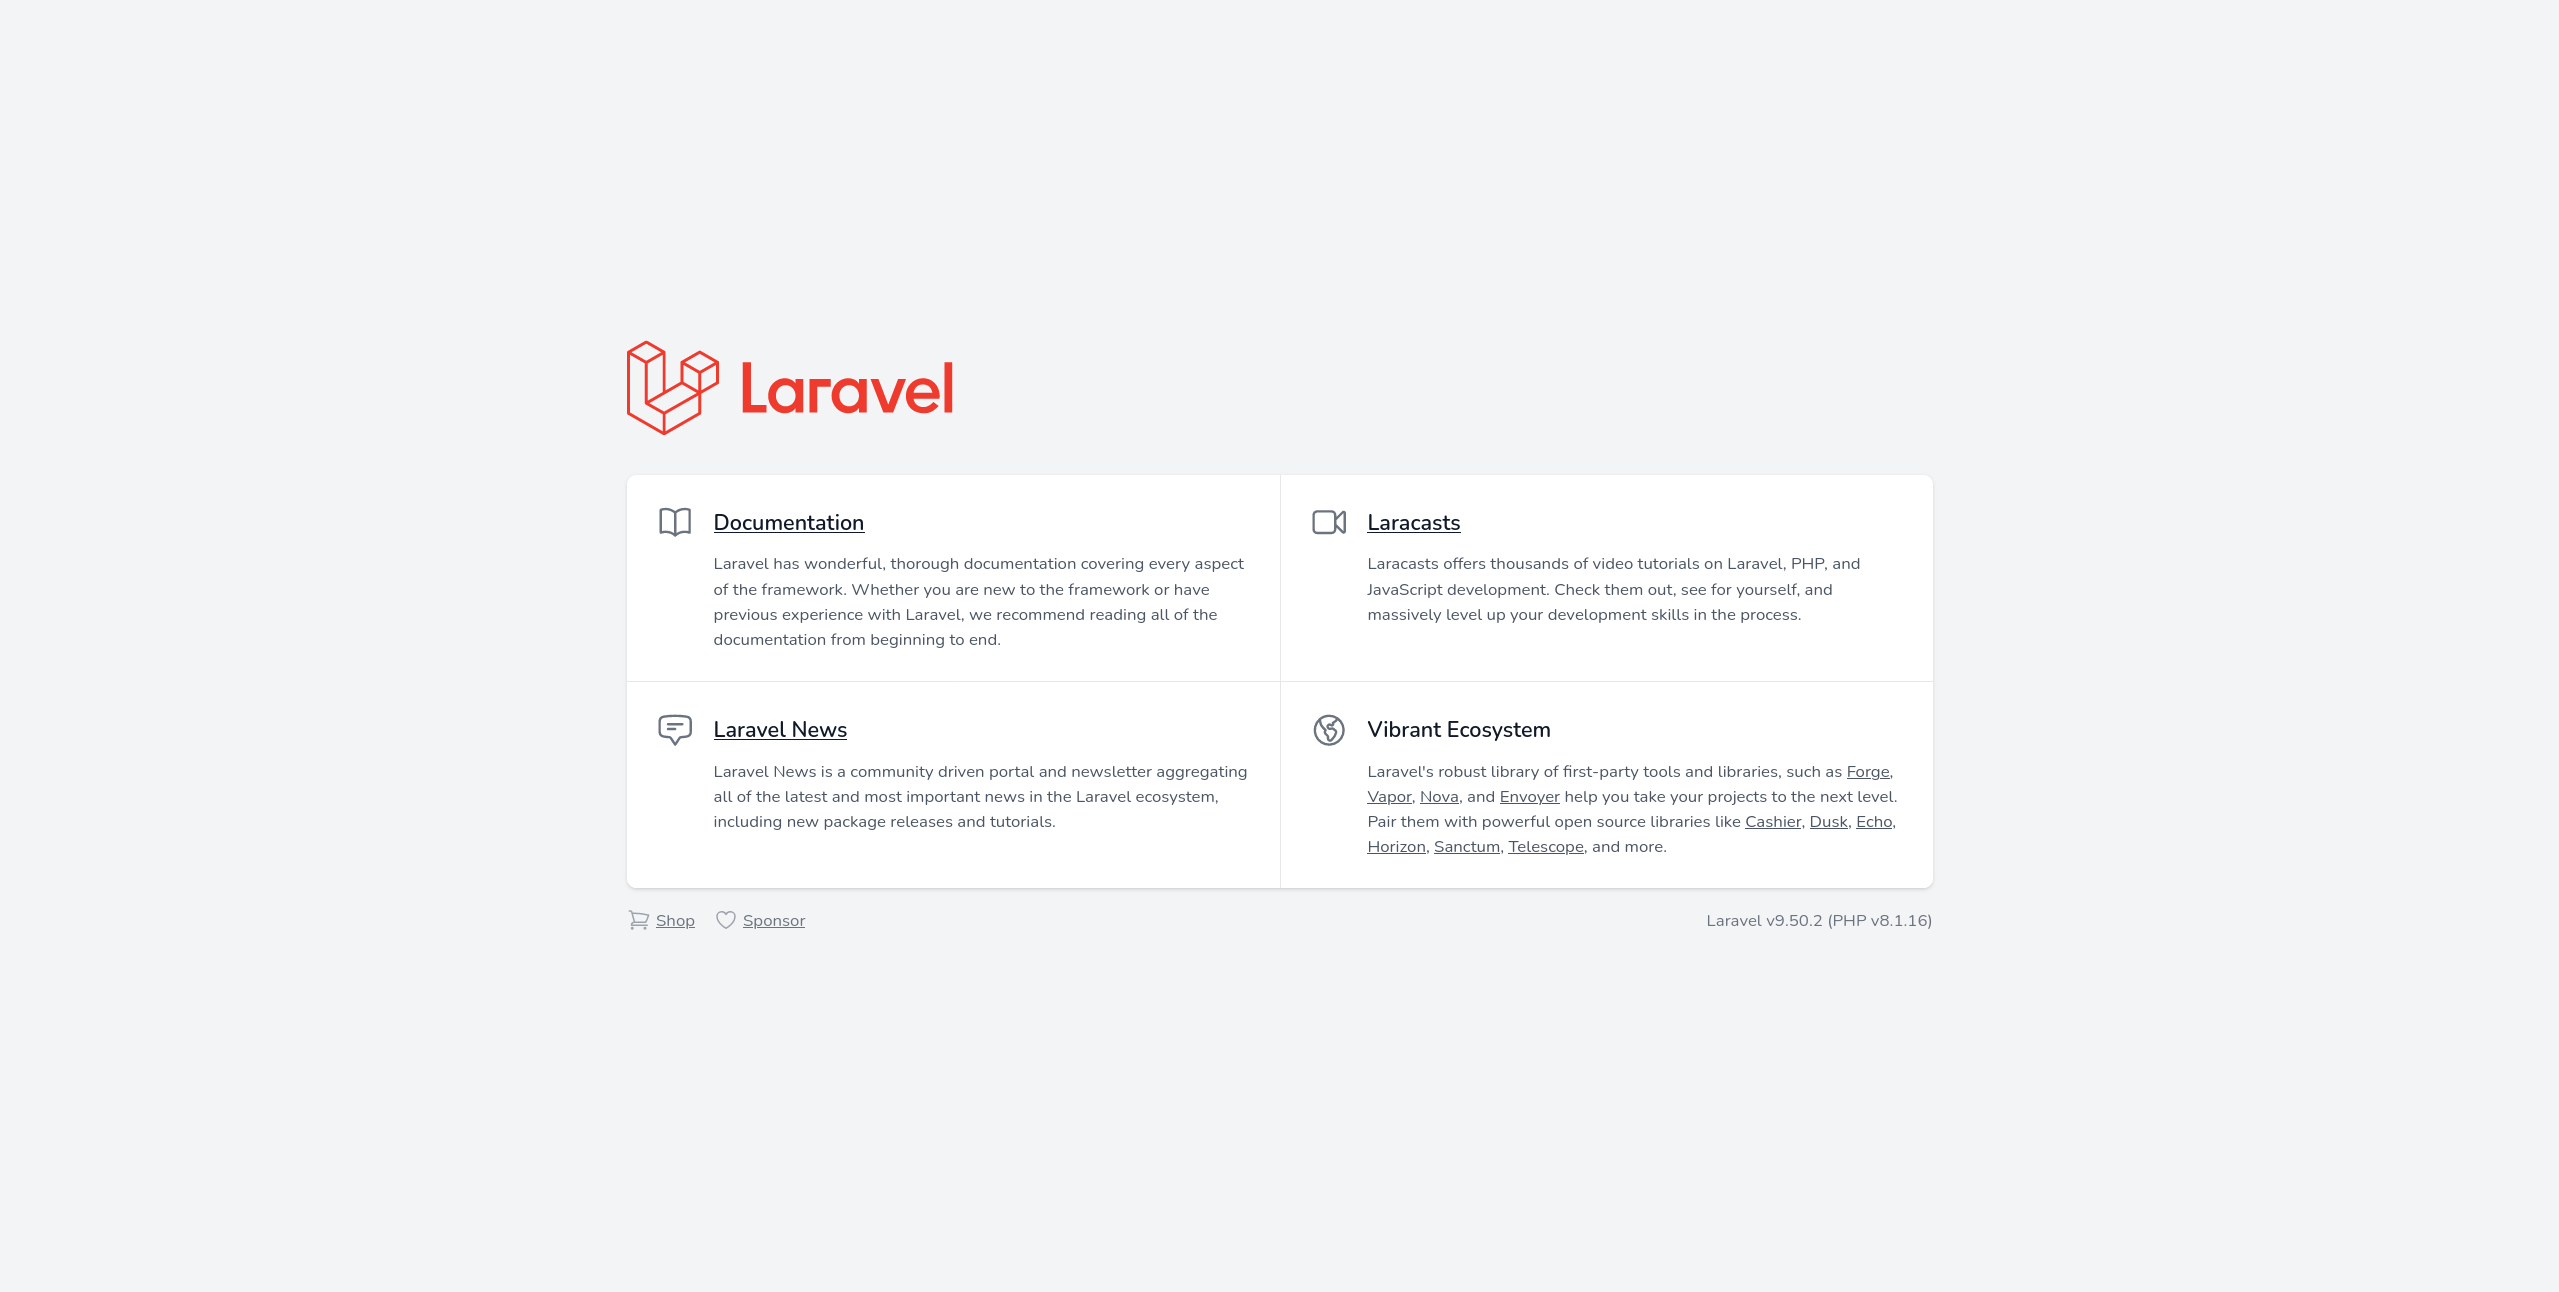
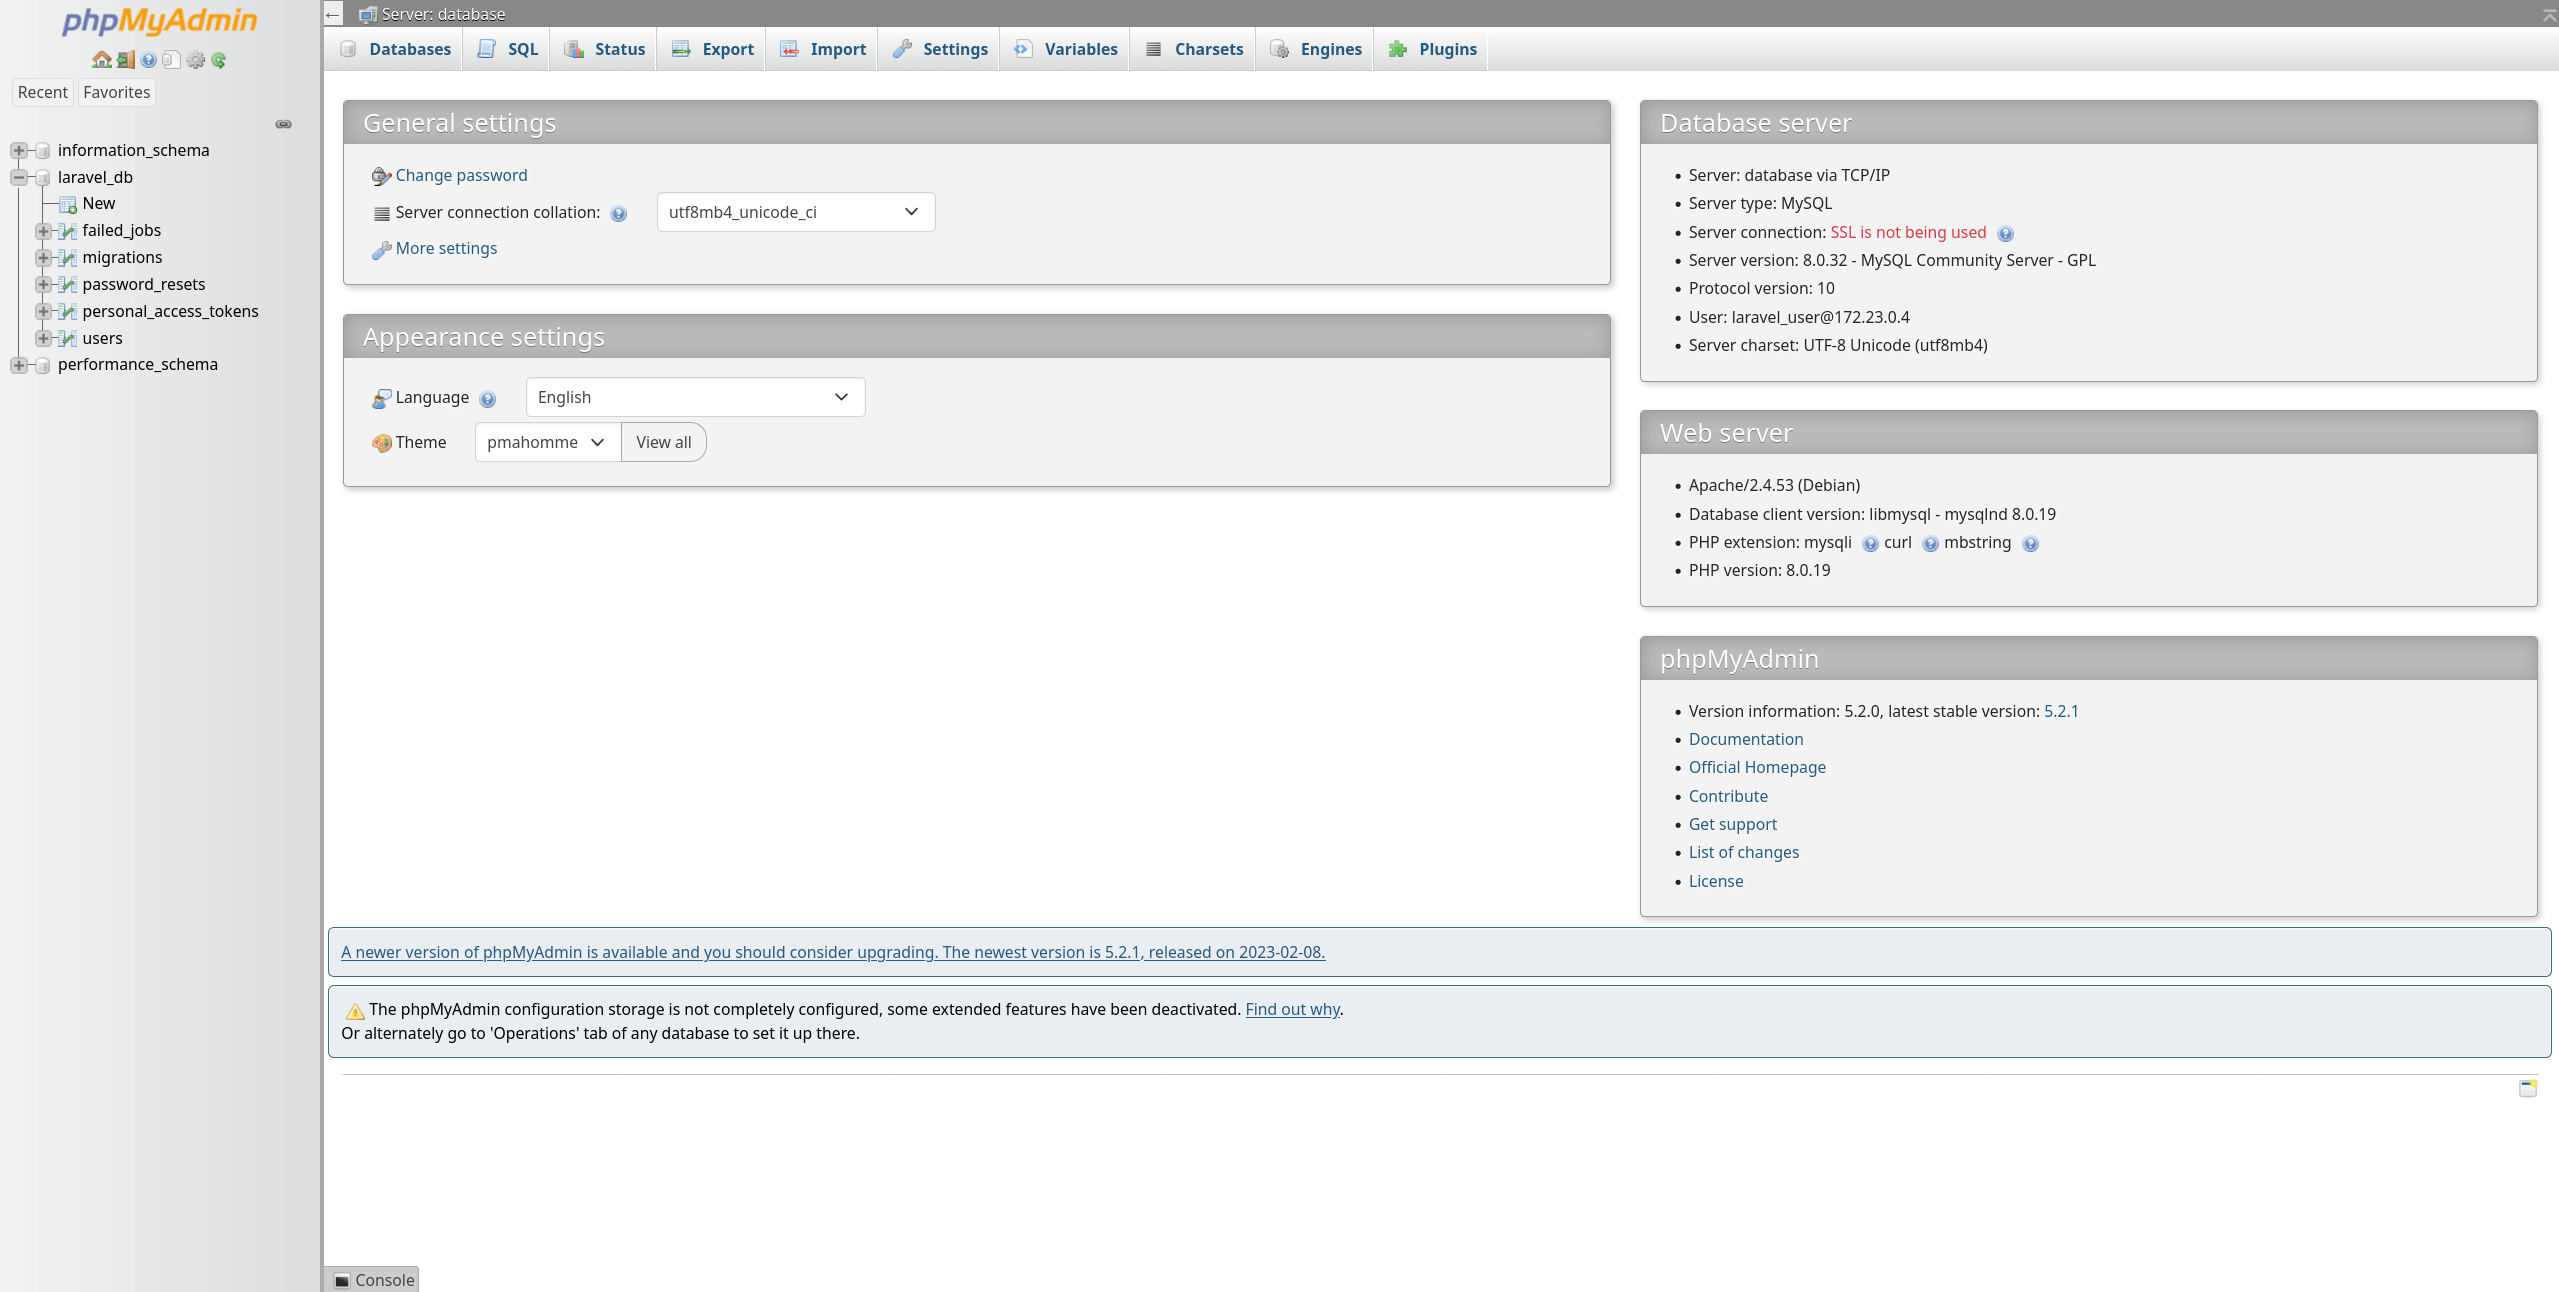
When you have finished this tutorial, you will be able to develop a Laravel website completely online in OpenVSCode.
Contact
If you have any questions or just want to give some feedback, you can e-mail me using the contact form of this website.
Port configuration
Apache port
1. Open port 8000 for the Apache container.
sudo firewall-cmd --permanent --zone=public --add-port=8000/tcp
2. Reload firewalld
sudo firewall-cmd --reload(No SELinux rule needs to be made, because port 8000 is only used internally.)
Add new virtual hosts
1. Go to the directory /etc/httpd/conf.d/
cd /etc/httpd/conf.d/2. Open the reverse proxy configuration file.
sudo vim reverseproxy.conf3. Add the following temporary code.
<VirtualHost *:80>
    ServerName [new or second domain name]
</VirtualHost>

<VirtualHost *:443>
    ServerName [new or second domain name]
</VirtualHost>
Get SSL certificate
1. Request the certificate from Let's Encrypt
sudo certbot --apacheSelect the domain name for which you want to request the SSL certificate. Wait until the certificate is deployed successfully.
2. Restart Apache
sudo systemctl restart httpd3. Test if the renewal of the certificates works.
sudo certbot renew --dry-run4. Open the reverse proxy configuration file.
<VirtualHost *:80>
    ServerName [new or second domain name]
    RewriteEngine on
    RewriteCond %{SERVER_NAME} =development.jeroenverhoeckx.com
    RewriteRule ^ https://%{SERVER_NAME}%{REQUEST_URI} [END,NE,R=permanent]
</VirtualHost>

<VirtualHost *:443>
    ServerName [new or second domain name]
    SSLCertificateFile /etc/letsencrypt/live/[new  or second domain name]/fullchain.pem
    SSLCertificateKeyFile /etc/letsencrypt/live/[new  or second domain name]/privkey.pem
    Include /etc/letsencrypt/options-ssl-apache.conf
</VirtualHost>
As you can, the SSL certificate has been added to the virtual host with port 443
Add reverse proxy
1. Add the lines below to the virtual host with port 443.
    ProxyPass / http://localhost:8000/ nocanon
    ProxyPassReverse / http://localhost:8000/
All traffic will now be forwarded from port 443 to port 8000
Below you can find the complete code of the virtual host with port 443
<VirtualHost *:443>
    ServerName [new or second domain name]

    ProxyPass / http://localhost:8000/ nocanon
    ProxyPassReverse / http://localhost:8000/

    SSLCertificateFile /etc/letsencrypt/live/[new  or second domain name]/fullchain.pem
    SSLCertificateKeyFile /etc/letsencrypt/live/[new  or second domain name]/privkey.pem
    Include /etc/letsencrypt/options-ssl-apache.conf
</VirtualHost>
2. Restart Apache
sudo systemctl restart httpdphpMyAdmin port
1. Open port 8081 on your router.
2. Open port 8081 on the server.
sudo firewall-cmd --permanent --zone=public --add-port=8081/tcp
sudo firewall-cmd --reload
3. Allow HTTP traffic over port 8081.
sudo semanage port -a -t http_port_t -p tcp 8081
sudo semanage port -m -t http_port_t -p tcp 8081
If a rule for port 8081 already exists, use the option -m (modify), otherwise use the option-a (append).
4. Make Apache listen on port 8081.
a. Open the Apache main configuration file.
sudo vim /etc/httpd/conf/httpd.confb. Add the directive Listen
Listen 8081c. Restart Apache
sudo systemctl restart httpdAdd reverse proxy
1. Open the reverse proxy configuration file.
sudo vim /etc/httpd/conf.d/reverseproxy.conf2. Create a new virtual host for port 8081
<VirtualHost *:8081>
    ServerName [your domain name]
</VirtualHost>
3. Add the reverse proxy itself.
    ProxyPass / http://localhost:8082/ nocanon
    ProxyPassReverse / http://localhost:8082/
All traffic will now be forwarded from port 8081 to port 8082
4. Add (reuse) the SSL certifcate
    SSLCertificateFile /etc/letsencrypt/live/[new  or second domain name]/fullchain.pem
    SSLCertificateKeyFile /etc/letsencrypt/live/[new  or second domain name]/privkey.pem
    Include /etc/letsencrypt/options-ssl-apache.conf
Below you can find the complete code of the virtual host with port 8081
<VirtualHost *:8081>
    ServerName [new or second domain name]

    ProxyPass / http://localhost:8082/ nocanon
    ProxyPassReverse / http://localhost:8082/

    SSLCertificateFile /etc/letsencrypt/live/[new  or second domain name]/fullchain.pem
    SSLCertificateKeyFile /etc/letsencrypt/live/[new  or second domain name]/privkey.pem
    Include /etc/letsencrypt/options-ssl-apache.conf
</VirtualHost>
5. Restart Apache
sudo systemctl restart httpdOpenVSCode port
1. Open port 3000 on your router.
2. Open port 3000 on the server.
sudo firewall-cmd --permanent --zone=public --add-port=3000/tcp
sudo firewall-cmd --reload
3. Allow HTTP traffic on port 3000.
sudo semanage port -a -t http_port_t -p tcp 3000
sudo semanage port -m -t http_port_t -p tcp 3000
If a rule for port 3000 already exists, use the option -m (modify), otherwise use the option -a (append).
4. Make sure Apache is listening on port 3000
a. Open the Apache main configuration file.
sudo vim /etc/httpd/conf/httpd.confb. Add the directive Listen
Listen 3000c. Restart Apache.
sudo systemctl restart httpd5. Add a reverse proxy from port 3000 to port 2999
a. Open the reverse proxy configuration file.
sudo vim /etc/httpd/conf.d/reverseproxy.confb. Add the virtual host with the reverse proxy and the SSL certificate.
<VirtualHost *:3000>
    ServerName [your domain name]

    ProxyPass / http://localhost:2999/ nocanon
    ProxyPassReverse / http://localhost:2999/

    SSLCertificateFile /etc/letsencrypt/live/[your domain name]/fullchain.pem
    SSLCertificateKeyFile /etc/letsencrypt/live/[your domain name]/privkey.pem
    Include /etc/letsencrypt/options-ssl-apache.conf
</VirtualHost>
All traffic will now be forwarded from port 3000 to port 2999
c. Add a websocket proxy (needed for OpenVSCode to work properly).
<VirtualHost *:3000>
    ServerName [your domain name]

    RewriteEngine On
    RewriteCond %{HTTP:Connection} Upgrade [NC]
    RewriteCond %{HTTP:Upgrade} websocket [NC]
    RewriteRule /(.*) ws://localhost:2999/$1 [P,L]

    ProxyPass / http://localhost:2999/ nocanon
    ProxyPassReverse / http://localhost:2999/

    SSLCertificateFile /etc/letsencrypt/live/[your domain name]/fullchain.pem
    SSLCertificateKeyFile /etc/letsencrypt/live/[your domain name]/privkey.pem
    Include /etc/letsencrypt/options-ssl-apache.conf
</VirtualHost>
c. Restart Apache
sudo systemctl restart httpdRun OpenVSCode
Create project directory
1. Make a project directory in your home directory.
mkdir ~/openvscode2. Enter the directory.
cd ~/openvscodeDockerfile for Apache
1. Add a Dockerfile with the name Dockerfile_Apache
vim Dockerfile_Apache2. Add the code below.
FROM php:8.1-apache
RUN apt update
RUN docker-php-ext-install bcmath
RUN a2enmod rewrite
This file will be used to create the Apache container
Dockerfile for OpenVSCode
1. Add a Dockerfile with the name Dockerfile_OpenVSCode
vim Dockerfile_OpenVSCode2. Add the code below.
FROM gitpod/openvscode-server:latest

USER root

RUN apt update -y
RUN apt install -y git zip unzip libzip-dev npm
RUN apt install -y --no-install-recommends --no-install-suggests php8.1
RUN apt install -y php8.1-bcmath php8.1-curl php8.1-dom php8.1-mbstring php8.1-xml php8.1-mysql

RUN rm -rf /var/lib/apt/lists/*

USER openvscode-server

ENTRYPOINT [ "/bin/sh", "-c", "exec ${OPENVSCODE_SERVER_ROOT}/bin/openvscode-server --host 0.0.0.0 --connection-token [token] \"${@}\"", "--" ]
The above file will be used to create the OpenVSCode container with PHP installed.
Replace [token] with a your own passphrase. You can generate a passphrase with passwords-generator.org.
Create docker-compose file
1. Create a volume that can be shared between the Apache and the OpenVSCode containers.
sudo docker volume create --name apache_openvscodeThis volume will be stored in the directory /var/lib/docker/volumes
2. Create a volume for storing the data in the database.
sudo docker volume create --name laravel_databaseThis volume will be stored in the directory /var/lib/docker/volumes
3. Create a docker-compose.yml file.
vim docker-compose.ymlThis file must be in the same directory as the Dockerfiles.
4. Add the code below.
version: "3.4"
name: openvscode
volumes:
  apache_openvscode:
  laravel_database:
services:
  webserver:
    container_name: webserver
    build:
      context: .
      dockerfile: Dockerfile_Apache
    depends_on:
      - database
    volumes:
      - apache_openvscode:/var/www/html
    ports:
      - 8000:80
    restart: always
  database:
    container_name: database
    image: mysql
    restart: always
    environment:
      MYSQL_ROOT_PASSWORD: [root password]
      MYSQL_DATABASE: [database name]
      MYSQL_USER: [database user]
      MYSQL_PASSWORD: [password user]
    ports:
      - 9906:3306
    volumes:
      - laravel_database:/var/lib/mysql
  phpmyadmin:
     container_name: phpmyadmin
     image: phpmyadmin/phpmyadmin
     ports:
       - 8082:80
     restart: always
     environment:
       PMA_HOST: database
       PMA_ABSOLUTE_URI: https://[your domain name]
     depends_on:
       - database
  openvscode:
      container_name: openvscode
      build:
          context: .
          dockerfile: Dockerfile_OpenVSCode
      ports:
      - 2999:3000
      volumes:
      - apache_openvscode:/home/workspace
      restart: always
Don't forget to add some values to the database settings and your domain name to the attribute PMA_ABSOLUTE_URI
Run docker compose
sudo docker compose up -dThis command must be run in the directory development
Wait until all containers are started.
Open OpenVSCode
1. You can now open OpenVSCode on the address below.
https://[your domain name]:3000?tkn=[token]Don't forget to add your token/password to the URL!
Install Composer and Laravel
1. Open the terminal in OpenVSCode
Select the option Menu --> View --> Terminal
2. Download the Composer installer
php -r "copy('https://getcomposer.org/installer', 'composer-setup.php');"3. Verify the integrity of the installer.
php -r "if (hash_file('sha384', 'composer-setup.php') === '55ce33d7678c5a611085589f1f3ddf8b3c52d662cd01d4ba75c0ee0459970c2200a51f492d557530c71c15d8dba01eae') { echo 'Installer verified'; } else { echo 'Installer corrupt'; unlink('composer-setup.php'); } echo PHP_EOL;"4. Run the installer.
php composer-setup.php5. Remove the installer.
php -r "unlink('composer-setup.php');"6. Make the command composer available globally.
sudo mv composer.phar /usr/local/bin/composer7. Create a new project and install Laravel.
composer create-project laravel/laravel [project name]Change [project name] with your project name.
8. Set the correct file permissions for the directories and files.
find [project name] -type d -exec chmod 755 {} \;
find [project name] -type f -exec chmod 644 {} \;
9. Give Apache write permissions to the folder storage and bootstrap/cache
cd [project name]
chmod -R o+w storage bootstrap/cache
In our case Apache belongs to the 'others' user group, because Apache is running in another container.
10. You can now find the default Laravel website at the address below.
https://[your domain name]/[project name]/public/Don't forget to add the directory public/ (with the closing hash)!
Congratulations!
You now have your own online IDE for developing a PHP Laravel website!
Configure database
1. Open in the project directory the file .env
2. Add the database settings.
DB_CONNECTION=mysql
DB_HOST=database
DB_PORT=3306
DB_DATABASE=[database name]
DB_USERNAME=[database use]
DB_PASSWORD=[password user]
The value database of the property DB_HOST corresponds to the service database in the docker-compose file.
3. Run artisan migrate to create some default tables.
php artisan migrateIf this commands work, you know that the database connection is working.
Update OpenVSCode
1. Stop and remove all containers.
sudo docker compose down
2. Rebuild all images.
sudo docker compose build3. Create and start the containers based on the new images.
sudo docker compose up -dBackup and restore
Backup volumes
1. Backup the volume openvscode_apache_openvscode
sudo docker run --rm --volume openvscode_apache_openvscode:/volume_data -v $(pwd):/backup ubuntu tar cvf /backup/openvscode_apache_openvscode.tar /volume_data2. Backup the volume openvscode_laravel_database
sudo docker run --rm --volume openvscode_laravel_database:/volume_data -v $(pwd):/backup ubuntu tar cvf /backup/openvscode_laravel_database.tar /volume_data3. Move the backup files to an external drive or an USB stick.
Restore volumes
1. Move the backup files from an external drive or an USB stick to your server.
2. Restore the volume openvscode_apache_openvscode
sudo docker run --rm -v openvscode_apache_openvscode:/volume_data --volume $(pwd):/backup ubuntu tar xvf /backup/openvscode_apache_openvscode.tar -C /volume_data --strip 1
3. Restore the volume openvscode_laravel_database
sudo docker run --rm -v openvscode_laravel_database:/volume_data --volume $(pwd):/backup ubuntu tar xvf /backup/openvscode_laravel_database.tar -C /volume_data --strip 1
The bigger picture
This blog post is the second part of a bigger project to have my own cloud platform (Nextcloud), online development environment (this post) and online UX design tool (Penpot). The two other projects are also documented and you can find the links to these blog posts below.
Links to the other two blog posts:
The image below shows all the containers and end-user applications that will be running when you have installed Nextcloud, OpenVSCode en Penpot.
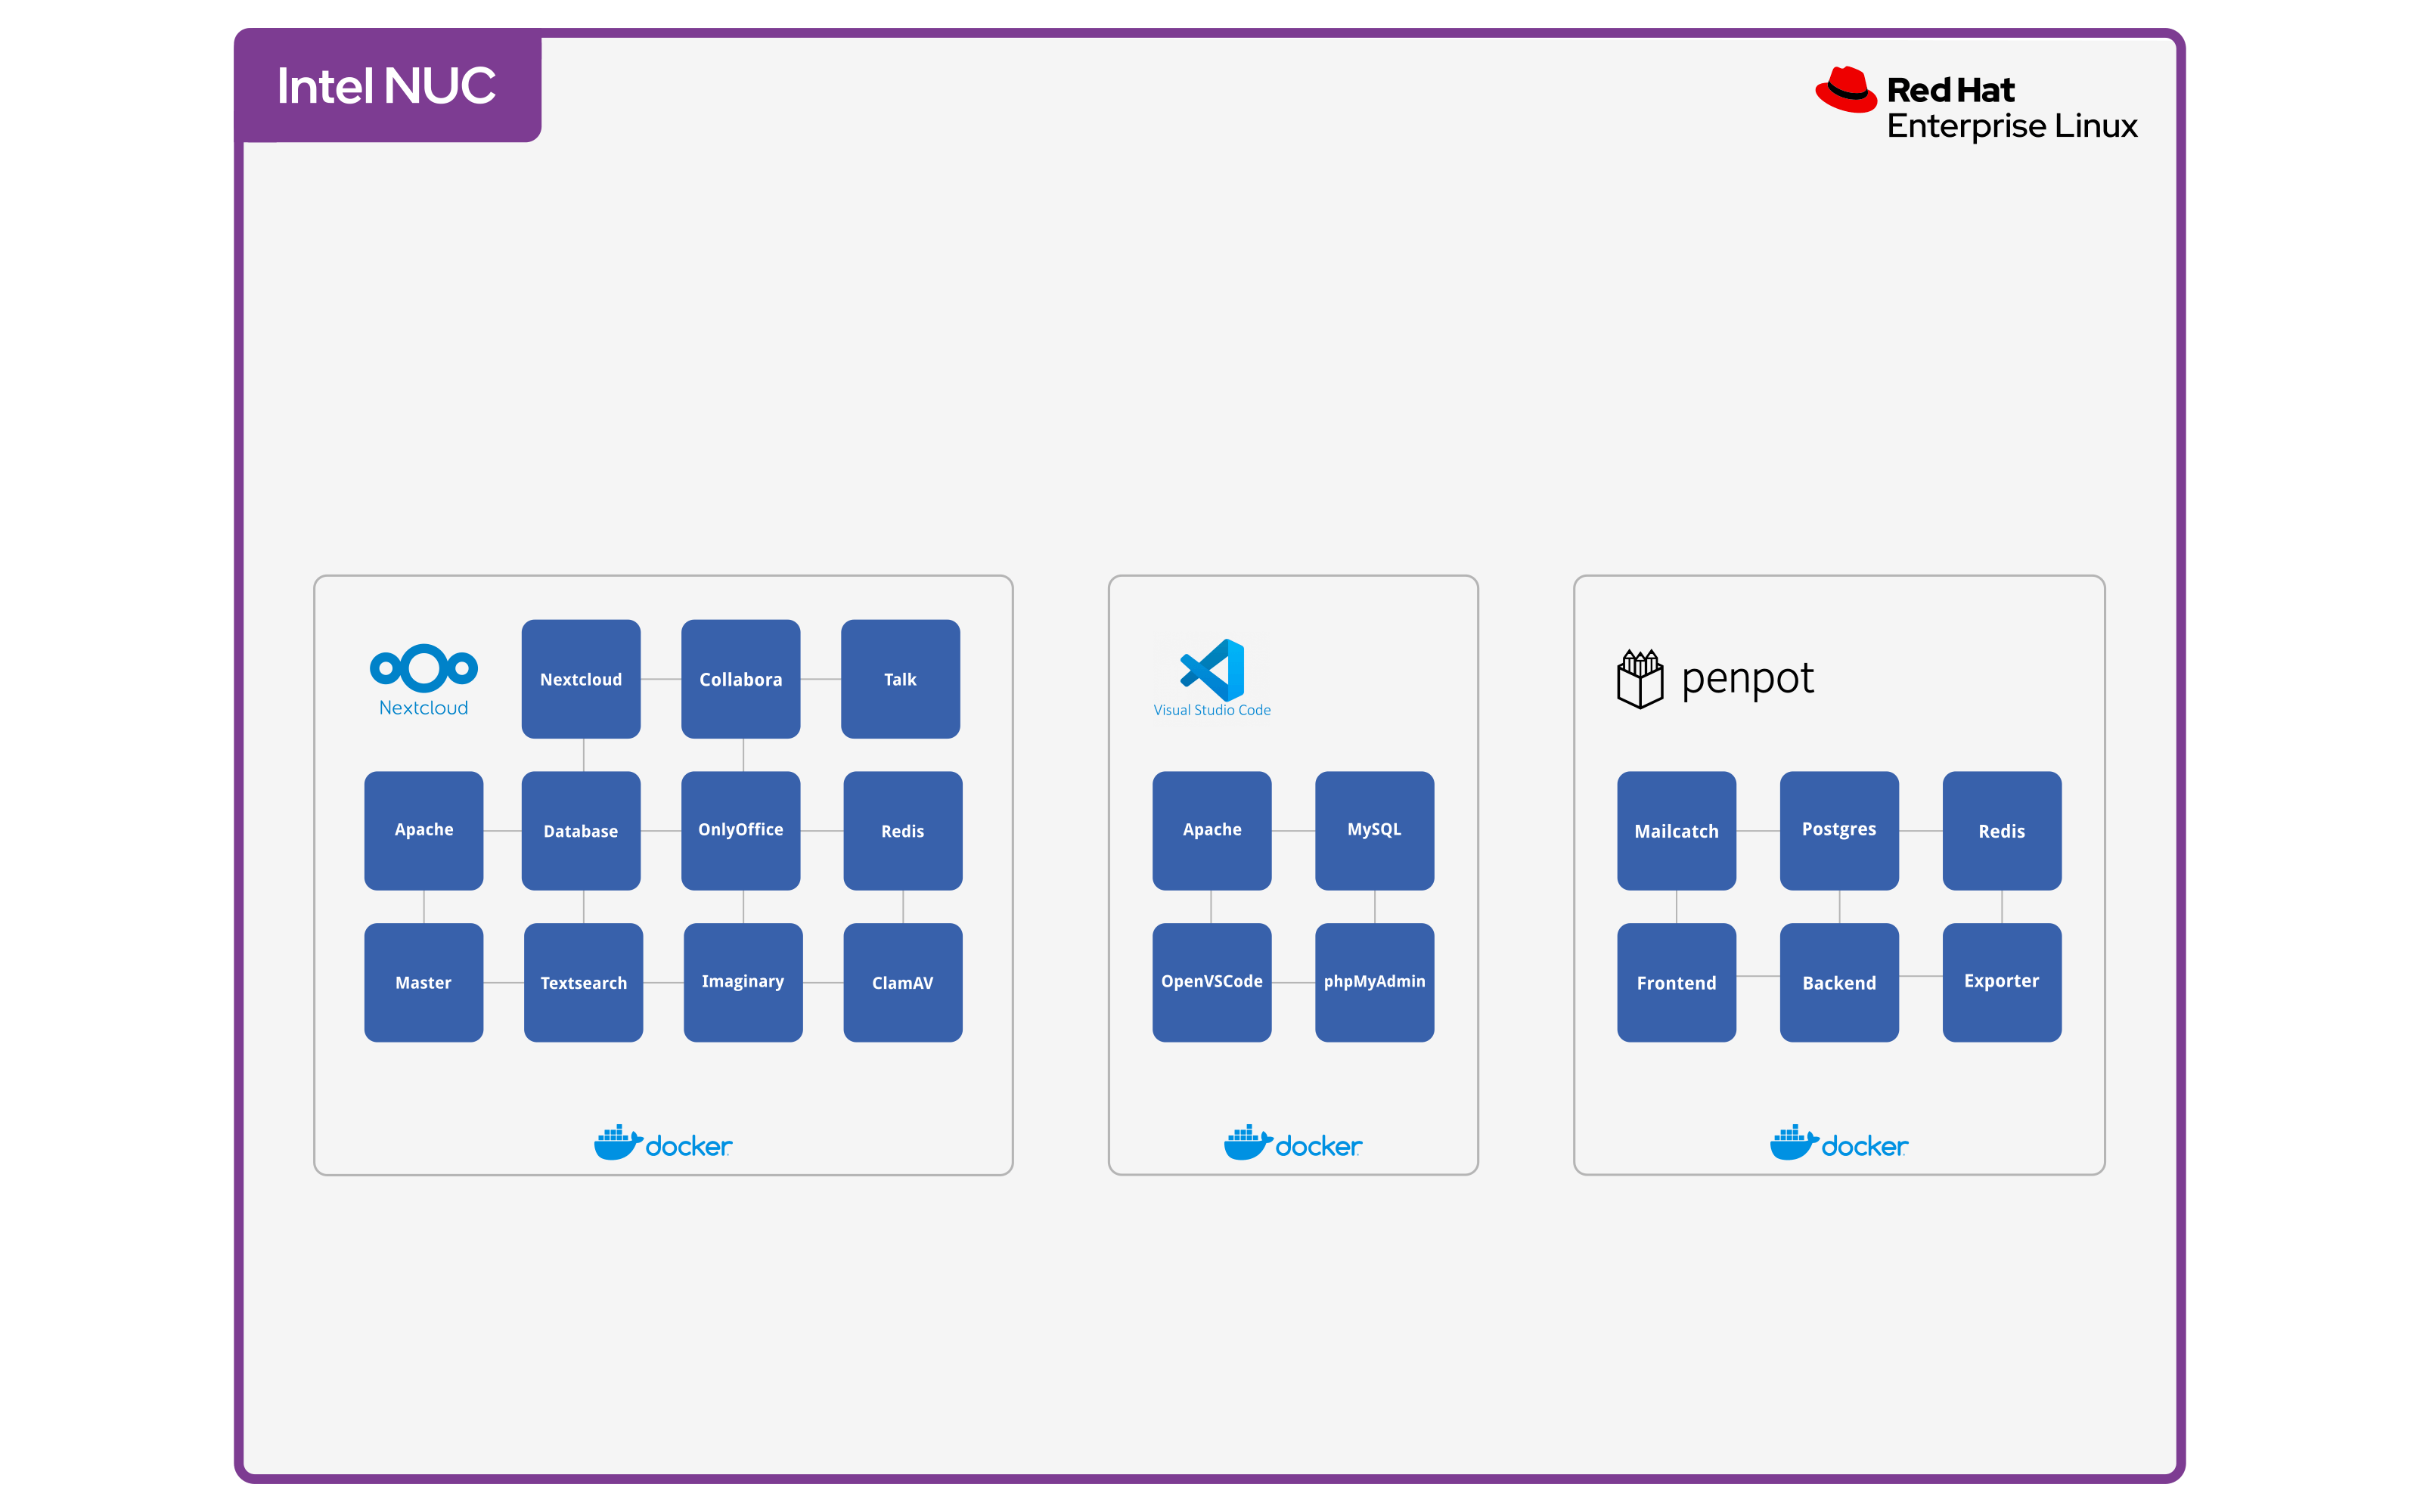

Have fun with your server!